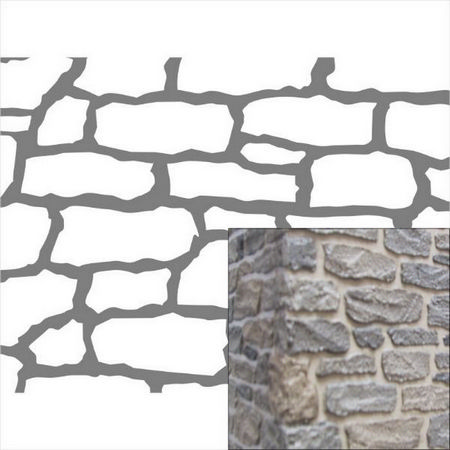
The lines can be curved or straightbut should be sized to make stones suitable to the scale you want for your project. I added a little brighter green to some of the lichen patches for variety.

An off-white in some spots can bring back a highlight lost under the oil washes. While the article is lost to the warp after the purge, its spirit lives on in this tutorial. So, heres how I do it, using a section of stone wall from the GW Garden of Morr kit as an example. Apply it over some of the streaks or lichen stains to make the rock there look dank. I use Miniature Paints #62 Sand for my Yorkshire stone colour. Oils have a reputation for slow drying, but thinned with mineral spirits can greatly speed drying time. Reason One: Everybody seems to paint their stone walls, rock faces, hill sides in some variation of black basecoat drybrushed grey. On this wall, more dry brushing of various colors is needed to balance out the wall colors before the final highlight layer is added. After lining I got to cutting in the lines.
modeltrains There are no other basecoats to block in, or non-stone details to take care of. The stone technique used here can now be used on thin slices of foam glued to simple bookboard buildings, and more stone walls and outbuildings can be added to the scene keeping a similar look to the commercial pieces. Marines in for scale of course. As far as I could tell, too, there was no flash or sprue gates to file away either. Spattering can be done with any of your three colors, once you have the lightest color in place. In this tutorial painting miniature stone wall , we are painting a puzzle door from Modiphius elder scrolls boardgame. And any tips you might have to share are always welcome as well! How To Remove Paint Off Kitchen Cabinets With Alcohol? I weathered them a bit by trying to sand out some corners, but again, not the greatest of results from this. The Foamcoat creates a very dense but flexible coating, which stands up well to knocks and movement. So here we go! But a final drybrush and some detail work will really make it pop. The pencil will just pull away the styrofoam beads for rough seams between the stones, if you want a neat line for dressed stone block walls, use a craft knife to mark the lines. In addition to the three main colors, you should also have a highlight color. Next, I sprayed the model with a dark gray primer. Make sure you have decided on an appropriate coating and three colors of "stone" plus a highlight color for your stone wall. Its disadvantage is that it sets up quickly and once set needs strong carving or sanding tools to adjust it. Wait for the glue to finish drying and hit it with a quick Matt Varnish. I followed this with a drybrush of just the Vallejo Dark Sand and finally a 50:50 mix of Vallejo Dark Sand and pure white. I ended up skipping the pencil step for this piece and just cut into the foam at angles to get the separation for each stone. document.getElementById( "ak_js_1" ).setAttribute( "value", ( new Date() ).getTime() ); Enter your email address to follow my blog and receive notifications of new posts by email. For the final scene, sections of the wall will be made using the same techniques and colors, but adapting the process by thinning the dark coat intended for the cracks between the stones. Give it a couple of hours to completely dry and the wall looks like this: Now at this stage, your wall looks pretty fine, so you could leave it here if you like. The section in the center shows the uncoated foam, while the section on the left has been coated with Rosco Foamcoat, an acrylic-based gesso which is much thicker than the regular artist's brand. And its done! This is followed by a light-brown or yellow color over the previous layer. Lightweight, Inexpensive Scale Models of Stone Walls, Strengthof Foam for Miniature Stone Walls, Coatings to Texture and Strengthen Faux Foam Walls, How to Carve Faux Stone Effects in Rigid Foam, Decide on the Style of Stones You Want for Your Wall, Using Coatings to Strengthen Walls Made From Foam, Make Stone Walls From Styrofoam Bead Board, Create the Individual Faux Stone Outlines, Creating the First Layers of a Faux Stone Effect on Styrofoam Walls, Check Photos of Actual Stone Walls for Reference, Add Flecks for Stone Texture With Spatter Techniques, Balance out The Final Miniature Faux Stone Effect, Changing Faux Stone Finishing Effects With Texture, Other Examples of Stone Models Made From Foam, Make Realistic Water Features in Any Model Scale Using Sheet Plastic, Painted Stones and Rocks Are Easy to Make and Great for Gifts, Make Tiny Realistic Palms From Paper or Fabric, Flaunt Your Green Thumb With This DIY Mini Greenhouse, How to Use E-Z Water to Make Miniature Water Features, How to Make Corrugated Metal for Scale Buildings, Here's how to create interesting texture using acrylic texture medium, How to Fix Mistakes and Make Changes in Watercolor Painting, Match Old and New Wood with Common Household Items, Waterproofing Paper: 7 Ways to Waterproof Paper, 15 Adhesives That Should Be in Every Crafter's Tool Box, Keep Your Cosmetics Tidy With This DIY Makeup Organizer, How to Make a DIY Ice Cream Sundae Costume. That suits me fine, as I am not often a great constructionist when it comes to model making! At this stage, you can still go in a completely different color direction. In small or dark rooms, you may wonder if youre going to find the stone too dull or heavy-looking for your home decor because it doesnt look beautiful on walls. After surfing some Black Gobbo back in the day, I noticed a nice little how-to and decided to give it a go.

Fill in your details below or click an icon to log in: You are commenting using your WordPress.com account. Do you want rough-carved blocks, exactly square blocks, rough-edged dry stone walls, walls made from river rounded cobbles? Allow this second coat (if needed) to dry. You will need to decide on the characteristics of rock found in the area (check actual photos of stone walls)or match the stone to the colors you choose for soil (worn stone is the basis for many soils). James is using the following RedgrassGames Painting tools. James. If possible hold the dowels in the foam with glue and also run glue along the board across the width of the joint to hold the boards together. What have you used for the tree and foliage, and also, I notice the colours you use are not citidel colours, what are they? If you don't carve the surface, your wall will look flat, and you will need to build up layers of coating to shape your stones. Tape can be used to protect surrounding areas. If you were using small blotches of paint, continue using that technique. Dont forget to visit The Painting Corps for regular updates with tips for the newest wargamer to the most grizzled veterans. You can use a pencil or a knife to scribe the general layer lines for your faux stone wall. Drywall and spackle tend to absorb moisture and have a tendency to crack and chip. Sometimes you need to persevere with highlights, until almost suddenly, it all comes together and pops. Well, after finishing all the line work, I went to begin cutting into the foam and where there was sharpie, there was no longer nice solid foam, it ate away at the foam just enough so that when you cut directly into the line, you pulled up all the sharpie mark instead of making a neat little cut. You may be wondering Why Yorkshire stone..?. It can really take a beating!

However, it's widely used in painting miniature terrain, and from the looks of it, it's not going anywhere.
painting stone stencils stencil favorite items furniture plaster similar Instructions for using modeling materials to make stone finishes are given in this tutorial using paper clay to make a faux stone foundation for a porch on a rustic cottage. If you want striated stones that resemble shale or sandstone, use a stiff brush to spread your compound in one direction across the top surface of your stones, leaving strong lines of colored compound behind. I wanted some subtle color modulation to the puzzle door. After trying to sand, I cut out some corners, and added some cracks and divots to complete the weathering. After it was all said and done, I did a quick drybrush over it all with Bleached Bone. Your basic color palette should have three main colors, a dark, a mid-tone, and a lighter tone. HubPages is a registered trademark of The Arena Platform, Inc. Other product and company names shown may be trademarks of their respective owners. I dont think theres anything wrong with this at all, I simply decided that I wanted my scenery to look different.

Go in for a second layer of paint with a lighter color. Try to leave some of the darker colors underneath showing. Dry stone walls can have some deep crevices between stones. The puzzle door is one solid chunk of resin. The finish should be building up in layers on the front edges of the stones, adding some more texture and depth to the shapes you originally carved. (LogOut/
miniature stone walls dry amongst stoneworks giants wright tony musician artist pebbles Use a drop cloth to cover the floor below and around the stone wall. With the base colour added here and there, the wall looks like this: I next mixed a little brown paint into the base colour and painted a couple of random stones using this colour and then did the same by mixing some grey into the base colour and picking out another few stones. Remember, Spraypaint Melts Foam, so be sure you dont go nuts with the spray can. Once we have painted our PCs and enemies, terrain is an afterthought. Sanded grout is also useful, but the size of sand used may not suit some scales. I ended up pulling the knife back into service in a lot of spots that were being stubborn. High-density insulation foams and other rigid foams can be carved with craft knives, pottery greenware tools, or polymer clay blades. Yes, it should be good for warhammer as well.:). I brushed on a wash of Army Painter Strong Tone ink. Before you choose, consider how you will use the model: The strength of a terrain depends on the backing, the modeling material applied to the backing and the coating used to protect the modeling material. If youve done something similar, we would love to see it!
miniature stoneworks giants amongst stone pebbles wright tony musician dry walls artist We want that dry, scratchy, organic weathering feel that drybrushing can achieve.

Paint your stone to make it a little more durable. This really doesnt work as easily as you expect it to. The first time I picked up a White Dwarf magazine back in 1991, dry brushing was a prevalent technique used by wargamers. You can see examples of this (with varying degrees of success) in how Ive painted my Tabletop World Stone Bridge, Windmill and the GW Deathknell Watch, Walls and Fences and Fortified Manor.
stone miniature dry walls mini giants stoneworks amongst pebbles rocking curtsy meadows ashley built 
Sometimes there is mould release agent residue left behind. When modeling terrains for villages, gaming, railroads or dollhouses, there are a number of material options.

Get DIY project ideas and easy-to-follow crafts to help you spruce up your space. You can spatter or dry brush the dark and mid-tone colors on top of the lighter color in some places to break up areas which are too flat. Then, apply the darkest colors first and work up to the lightest one. So different how? Try not to accidentally cover up all the bottom paint layers on your miniature during the buildup, or else you will get a flat texture and have to start all over again. I added some weathering around the base of the model then with Bestial Brown, very lightly highlighted with Snakebite Leather. Im happy with the results for the time invested. Although foam can easily be made into stone for walls, model horse jumps or buildings, or left to free-fall down mountain terrains in railroad scenes; you may prefer more structured modeled stones from plaster, clay or paper clay. All you need is a stone wall, a few brushes and colours, and youre set to go! Powered by Squarespace.
miniature I found that it took two or three dips until I wasnt seeing wet glue spots. Drybrushing is not too friendly to your nice premium brushes. All in all, a really easy but effective method. I used the same primer (white) for my wall painting. The dense coating, however, filled the spaces between the stones, making the wall look too formally constructed, possibly mortared. Sr. Editor & Publisher: Larry Vela
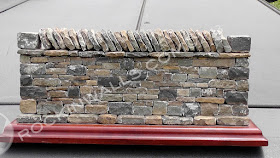
Sometimes you need to persevere with highlights, until almost suddenly, it all comes together and pops. So, I decided to try and replicate the golden colour of Yorkshire Stone in my scenery.

Any time you sit down to start a new paintjob, think about end goals. Don't mix the color in completely, as the variation of the color mix in the paint gives some depth to the final effect.
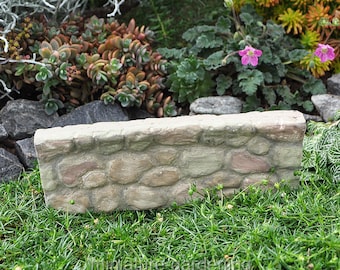
miniature When you are finished the entire wall should be covered in your darkest color, and no white areas should show through. Google images is a great reference or just talking a walk outside! I chose to use it on a small simple wall to try out some techniques I ended up using later on for other terrain. The dense foam coat coating made stones with very similar surface texture to the ones in the commercial well it is intended to fit beside in the scene. Its just as thick as the last piece, if not thicker, but it looks more natural than the last one.

Toward the base and in crevices might be good.
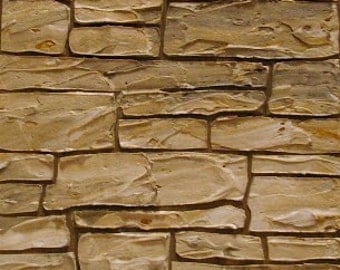
stone village walls christmas scale styrofoam faux villages paint display different houses foam recycled types nacimientos terrain bead navideos ornaments In the sample above, the deep cracks look more natural.
reaper thecraft reapermini If you are working with existing miniature pieces (village buildings for example), you should tone your stone to match that of the village pieces. They can be the same color (dark grey, mid-grey, light grey) or they can be a range of colors found in the stone in a particular area, dark grey or grey-green for the shadows, rust-brown or raw umber for the iron-stained stones, and pale grey, cream or ochre for the lighter or worn areas. In this course you learn step-by-step how to paint ultra-realistic stone walls, which is ideal for your next Diorama base or terrain project! You can even ruin the appearance of your stone when you paint it. Although your first attempt may not be exactly what you want, keep experimenting to find a method that works for you. Lesley Shepherd is a miniature artisan who shares her knowledge about miniatures. My Kings of War Undead Army, The Walking Dead: All Out War, Deadzone, Cthulhu Wars and Other Tabletop Miniature Gaming, After posting up my blog about my Fortified Manor, I received some very flattering comments about how Id painted the set. Compare the photo of this wall with three gray layers to the version of it on the first page of this tutorial. Gray is a great priming color as it is a good compromise between white and black primers. You can paint the stone using your brush if you want it to stand up. I chose a blue-gray as the base color for the stonework here. Very little ruins all your hard paintwork like taking a drybrush to a model where the wash isnt dry and then smearing said wash all over the upper surface of the model. if it is, you can remove some using a paintbrush or small twists of tissue paper. Here you can find a range of options for creating walls and stone buildings different materials. I started off using just a small bit of pink insulation foam that I had laying about. I airbrushed this on for speed and convenience, leaving a little bit of variation here and there by spraying the paint less thickly in places. I used a 50:50 mix of the Minature Paint #62 sand Vallejo Model Colour 70.847 Dark Sand (which despitethe name is much lighter in colour than Miniature Paint #62 Sand) to drybrush all the stone work, skulls included; whilst trying to avoid the gate and spikes. For very rigid coatings, possibly suited to use outdoors, you can use unsanded grout, mixed with some acrylic extender to keep it more flexible and help it adhere to the foam base.
stone shackles halloween stone dollhouse dungeons cages miniatures miniature faux potter harry murs chains mur prop tutorials gi joe dungeon What Kind Of Paint Do You Use On Stone Walls? Use the actual measurement of the figure or the door, divided by the assumed scale height (6 1/2 to 7 feet for a door) If your door measures 5 inches, and should represent something 7 feet (84 inches) high, your scale will be 1 inch = 84/5 or one inch of your model represents roughly 17 inches if the scene was full size. I decided to start with a reliable old sharpie marker to get the lines down. See how stones naturally weather, stain, and color in different ways. While a number of people swear by using drywall compounds and spackle to coat foam terrains, there are better methods! This can interfere with the paint adhering to the surface properly. These instructions show you how to use various supports and model all kinds and colors of stone walls from dense insulation foams, florist's foam or styrofoam beadboard, and various protective and paintable coatings.
Once youve coated the entire wall section, give it a minute or two to settle and then look at the wall to see if the ink is pooling too heavily in any one place. It will really stick, and the amount of paint will be able to do as easily. When drybrushing, try to work the bristles of the brush down the model predominantly, as light generally hits something from above, not below. When gluing corners or other areas where the foam may be subject to stress (rock outcroppings, stone arches) use small sections of wooden dowels or kitchen skewers inserted in the ends of the boards to help strengthen the join. The Army Painter Strong Tone ink ties together the different shades of stone brilliantly and even adds a degree of shading to each individual block of stone that comprises the wall. So I dont really suggest sanding all that much. Heres another try with the same method. jayjay40 from Bristol England on February 17, 2010: Love the hub, I'll use this for my warhammer buildings. Trust me on this. But for this one, it just seemed to texture the foam in a way I really wasnt too keen on. All rights reserved. Freestanding stone wall sections made of insulation foam are considerably strengthened by using a coating.
If pieces need to be moved and stored for occasional use and don't receive a lot of wear (village displays) you can use the easiest obtainable foam, with an appropriate coating. Names, trademarks, and images copyright theirrespective owner. Just as with other foams, when making faux stone walls from styrofoam beadboard sheets or recycled packaging materials, first cut and assemble the pieces for your project, according to the scale and design you need.

When coloring your faux stones or walls, you should work with a simple palette of colors chosen to match your scene.
stone painting 3d tutorial far process done Sharif Ishnin (author) from Singapore on February 17, 2010: Thanks.

You could at this stage also add some pigment weathering, too. The All-In-One Virtual Tabletop That Spans Any Era || RPG Stories, YouTube Video VVVQUWRYUHAySjhEbUQwemhRaU12RW5BLmFWcHFTS1hVUGtv, Dead Man's Chess - How To Play || Spyglass Games, YouTube Video VVVQUWRYUHAySjhEbUQwemhRaU12RW5BLkVqVGxmdHBjd1VV, Dark Commune & Chaos Cultists || Mini Spotlight, YouTube Video VVVQUWRYUHAySjhEbUQwemhRaU12RW5BLmtGTzZGUHZSVWEw.

I would definitely recommend using them on an RGG Glass Palette as it is a great surface for oil paints and mixes. Change), You are commenting using your Facebook account. Don't worry if you get too much color in an area (see the section of wall on the right in the photo) You can always go back over the section with another coat of some darker paint to break up large areas where you applied to much paint. It's an easy method to follow, and many miniature painters like to utilize this painting technique. Once dried, the wall looks like this. You won't be applying much more color between the stones, so the bead shapes need to be well disguised with your darkest color in these areas. For the final color, use white or almost white. This may take one or two coats (especially if you are using gesso). I would just stick to the knife on this one. So long story short dont use sharpie on foam projects!
dollhouse miniature paper scale diy tutorials clay stone walls roof shingles houses construction furniture mache victorian techniques materials workshop cardboard By clicking Accept All Cookies, you agree to the storing of cookies on your device to enhance site navigation, analyze site usage, and assist in our marketing efforts. Painting realistic stonework will enhance and make the diorama look more believable.
dolls stone creating miniature doll exteriors authentic guide fairy walls gardens houses craft dollhouse exterior project chapel garden miniatures diy 
Although I also like a little paper towel too, to help remove excess paint from the dry brush before painting. To create the stone wall shown in these examples, a suitably sized piece of dense foam was cut to size for a stone wall. If you have been using a dry brush (a brush first loaded with paint that you press into a paper to remove the paint from the tips of the brush) to drag across the stones, add the lightest color to some stones using the same technique. Let the capillary action do all the hard work for you!

PAINTING MINIATURE STONE WALL: GRAY STONE, PAINTING MINIATURE STONE WALL: USING OILS, PAINTING MINIATURE STONE WALL: RECIPE CARD. Finally, carve some dents into the surface of individual stones, or cut small sections away with a craft knife to make them less flat on the surface.
(note the airbrushed base coat looks a little darker in this picture than the one above simply because it was getting dark outside as I took this photo). Department 56's Little Town of Bethlehem uses resin rocks which have squared, hewn edges in a basic color palette of gray-green, raw umber, and light ochre. Theres something for everyone. The techniques are the same whether you are making miniature terrains, railroads, dollhouses, or terrariums for your lizard.

Plus painting it all in a uniform way is not only unrealistic, it is not fun. She has over 30 years experience teaching this highly specialized craft. In the photo above, three degrees of gray Foamcoat have been added to the styrofoam wall section.